Manual editor - Manual
PDF ManualWe have tried to design the manual editor in the simplest possible way so that it can be used even by users with limited computer experience. Nevertheless, it requires a short introduction and a little practice. Once you get used to it, creating sawing patterns will be quick and easy.
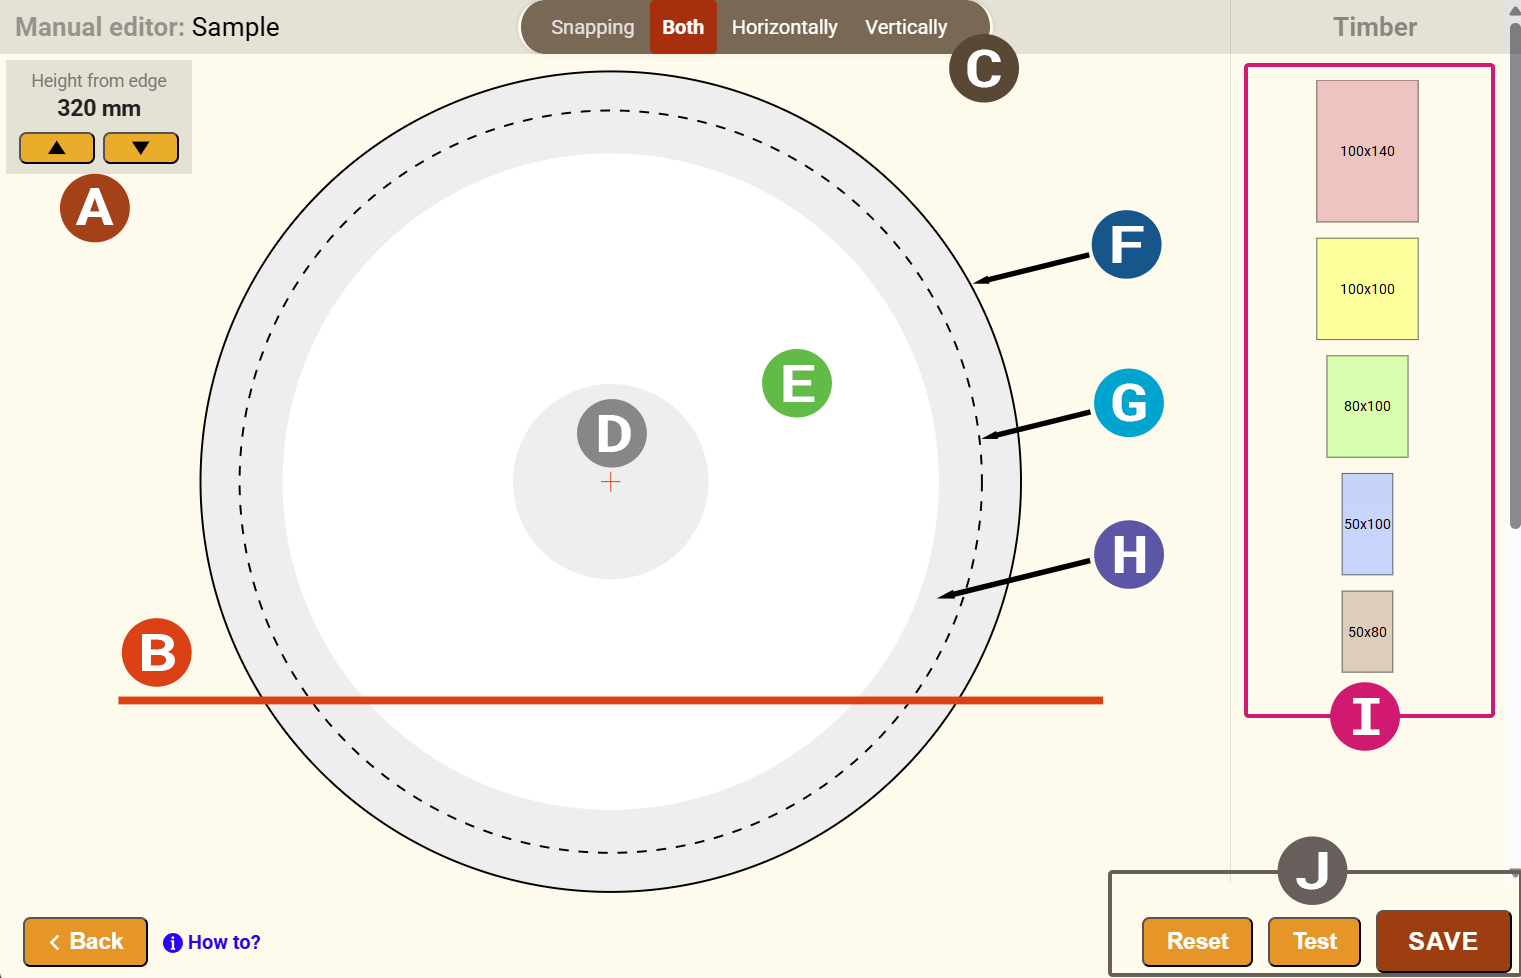
A | Setting the basic cutting plane |
|---|---|
B | Reference cutting plane (baseline) |
C | Snapping |
D | Heartwood |
E | Sapwood |
F | Big end diameter |
G | Small end diameter |
H | Waney-edge board zone |
I | Lumber items |
J | Buttons for processing the pattern |
Setting the basic cutting plane (baseline)
Set the height of the basic cutting plane (baseline) using the buttons on the top edge.
Pattern without turning
For patterns without log turning, the red line – the baseline – represents the lower limit below which no timber items can be placed. Its minimum height, measured from the bottom, is determined by the type of assigned machine or by its parameter “minimum cutting height”.
Pattern with turning
For patterns with turning, the placement of the baseline is arbitrary. The basic condition is that, after turning, the base defined by the baseline is wide enough for the stable positioning of the log. The thinner parallel red line indicates the minimum thickness of the last board, so timber items in this area must be placed higher and must extend beyond this line. The distance between the baseline and the minimum thickness is defined for the given machine by the parameter “minimum thickness of the last board”.
Inserting timber items
On the right side in the editor section, the timber items assigned to the sawing pattern are displayed. To place timber on the log area, click the selected item. The timber item will be placed automatically on the log area.
Placing timber
Start by placing the timber on the baseline from left to right. Position the cursor on the timber item, press the mouse button and drag the timber to the place on the log profile where you want it to be positioned. Gradually place the other timber items from left to right in layers. When the timber item is in the correct position and at the correct distance (for the kerf width) from other timber, a thin blue line (or lines) will appear, and the timber will snap exactly into place so that the cutting width is maintained. Release the mouse button and the timber will be placed correctly.
Rotating / deleting timber items
Timber items can be rotated or deleted. Position the cursor over the timber item and press the "R" key to rotate it or the "D" key to delete the given item.
Snapping
The system automatically snaps the timber item (horizontally and vertically) to those already placed on the area. However, in certain cases it is necessary to turn snapping off. For this purpose, there is a switch in the upper part of the editor, where one of the snapping directions can be disabled. For example, if you select the vertical option, horizontal snapping will be turned off and you will be able to move the item anywhere in the horizontal direction.
Zoom - magnification
By turning the mouse wheel, the sawing pattern can be zoomed in or out.
Testing and saving the pattern
After placing several timber items, we recommend checking the pattern regularly by pressing the Test button. If the position of any timber item is incorrect, the system will mark the problematic timber items. If the pattern is finished, press the Save button, the pattern will be saved in our system, the individual sawing steps will be generated and sent to the mobile application.